Thursday, 20 February 2014

.22 BSA Meteor Mk IV dissasembly


A bit of history


The Mk III and all three models of the MkIV are identical air rifles, the difference being that the Mk IV's were contructed out of poorer quality metal. The bigger and altogether different Mk VII is the final model to be made and is rated at 12ft/lb full power, though Mk's I thru VI are pretty similar and all produced about 10.5 ft/lb on a good day with the wind behind you. They were very popular as a first air rifle for larger youths and is still large enough for adults to use very comfortably, first appearing in the late 50's they have sold millions over the decades but recently the desistion has been made to close production. This tit bit of information informs us that there is not a shortage of Meteor's out there lying hidden waiting to be found and refurbished, though finding an old one with the rear open sights sill attached is next to impossible.


The story so far...


I picked up this .22 BSA Meteor over a year ago for a tenner, and believe me it was in a right old state.

Meteor after a quick clean over a year ago.

So i cleaned the metal work and decided to strip the enameling and apply some oil to stop further rust, 

The scope rail on the Meteor are a little shallow compared to a lot of other air rifles.


Top of the barrel in front of the breech

i also gave the inside a quick clean and lube as the buffer washer had disintergrated. 

No rust after storing for well over a year.

The forks are bent out a little allowing side play, 

Length of the cocking stroke.

this is common with most early meteors as the fore stock screws attach to a tab below the forks and will force the forks out when tightened up to much as the screws press against the breech block.   

Chewed up stock screws chewing into the stock, and a bloody awkward rear sight fitting.


The breech moved back and forth also, on closer inspection the breech pin was fine so the problem lay in the hole through the breech wearing wider against the hardened breech pin. 

The old breech seal originally crumbled out so i experimented with turning one out of Delrin, it was crap and didn't seal properly.


God alone only knows what other problems there are hidden away with this rifle, and the only way to sort them is fix them as they appear.

 Dismantling.


To remove the stock, first the trigger guard has to be removed. 

Trigger guard and a nice wide set back trigger, very pleasant indeed.

The screw at the back is accessable though the slot in the guard, this also conncts the stock to the rear of the compression tube.

You really need the right screw driver for this screw, though you can loosen it outside the guard and finish off with your fingers.

When the screw is removed the the guard is tilted out and slid out, as a tab holds it against the stock.

Simple trigger guard design, i like it.
Secondly remove the two screws at the front of the stock, and all the washers that have been added -or haven't as the case maybe. 
Added washers used to stop the screw pressing against the breech block.

These are the buggers that can force the forks apart when they have started biting into the wood over many years, i would imagine these screws get over tightened is because of the long cocking slot on the stock.

The long cocking slot needs the side screws to fit firmly, or else.

Then the stock comes away and is put to one side so you now get to the trigger assembly, which has to come out so the piston can eventually be removed.

Trigger assembly looks like this, useful for putting it back together.

There are three pins, One larger that pivots the sear, One smaller one to pivot the trigger, and another small one to act as a trigger stop.

The pins can fall out but usually don't, the rear stop pin is the usual suspect in most cases.

The pins can some times fall out, so be careful. However the are certainly loose enough to drift out with slight pressure from a small screwdriver, and this leaves you with a sear, a trigger, and quite a strong spring between the two.

Sear contact adjustment hex grub screw on the trigger, it rests against the trigger stop pin.

This is where i discovered that a bit of the trigger has snapped off, the part that secures the spring in place though there is enough left to just hold it.

And this is how it all should go back together, another useful photo to have for reassembly.

The plastic end cap can come off the end of the compression tube now so you can access main spring which is held in place by a washer and shaped retaining pin, the washer has to be pushed forward either side of the retaining pin. So a special tool needs to made which is easily done, i used a piece of metal pipe and an angle grinder.

The useful homemade tool for removing the mainspring, it really is easy to make.

Secondly the cocking arm needs to be removed from the compression tube, and the barrel needs to be removed for this

Remove the pin where the cocking arm joins the breech, so the cocking arm can slide back to allow the tabs though the wider part of the slot.

I decided to see how much play i had between the cocking arm and the piston when at rest, as it's possible to shorten the piston. The calipers gave me 7 mm to play with safely without the piston slamming into the cocking arm tabs.

Green tape marked where the end of the cocking arm rested with the breech closed, then open the breech till the cocking arm rests against the piston and measure the difference.

 The pin that holds the cocking arm to the breech drifts out easily enough, and is shaped so a rubber washer in the folded steel of the cocking arm pinches it in place and stops it working loose.

Note the shape of the pin and the rubber washer at the front of the cocking arm.


The breech pin drifts out easier one way than the other, and by breaking the barrel the detente bar and spring don't add to the pressure.

I placed the end cap there in case the detente bar shot out, there was really no need in this case as it turned out.

There is play between the breech and pin and it's the breech block, 


The shim i made over a year ago sat on top of the breech block, also the detente bar spring is a little worn but still useable.

though i had shimmed it before with a strip of Tango can and that fixed the problem.

The diameter of the breech pin hole...

The diameter of the breech pin which is the same as the hole in the forks, so that should tell me something.

Placing the prongs of the pre made metal tubing either side of the main spring retaining pin, the compression tube was put in the spring compressor and the retaining pin removed.

The retaining pin is machined to support the spring guide and washer, i had to prod the guide with a screwdriver to free it from the retaining pin.

  Then the preload is let off till the main spring is relaxed, and can then be removed.

A couple of inches of preload.

There was a couple of inches of preload, some of it was added by a delrin slip washer and a copper slip washer i had fitted before.

This is the spring it came with, it is a BSA spring though it may be a replacement for the original at some time.

Then the piston is removed.

Piston with hand made buffer washer and a worn O ring.


Usually at this point people can have a lot of trouble removing the piston because the original buffer washer on the piston has crumbled to dust, i had this very same problem when i first had the rifle apart.

Piston head assembly fits into a key hole slot on top of the piston body.

So i have already cleaned and polished the inside of the compression tube and made a replacement buffer washer, the rifle is also lightly lubricated already. Originally when i first took the internals out i used very fine grade wet and dry dipped in white spirits and cleaned the inside of the compression tube and piston assembly, this was clamped to the end of a rod so i could get right down to the transfer port. I followed this with OOOO wire wool then Autosol metal polish to give a highly smooth mirror finish, luckily there were no score or wear marks inside the tube.

Ali tubing with a slit down the end to act as a clamp, wire wool and white spirit cleaning a very dirty compression tube by the look of it.


A effective way to test the piston seal is to drop the piston into the upright compression tube while sealing the transfer port with your finger, if all is good the piston should stay put then slide down the compression tube when the transfer port is unblocked. If the piston needs a little extra weight to do this it's still a nigh on perfect seal, but if if it's a tight fit and needs a fair bit of effort to move the piston with an unblocked transfer port then the seal is over sized. One remedy is to put the piston and seal in a lathe and lightly wet and dry the seal till the fit is perfect, another is to put the rifle back together and put a tin or two of pellets through it till the seal sizes it self.

 With the Meteor the O ring piston seal was well worn and would slide freely halfway down the compression tube with a blocked transfer port, so in this state the air would only start to compress well after the piston was released severely lowering power.

Piston O ring outer diameter looks to be 26 mm.

O ring has a diameter of 3.5 mm.

Using the calipers i measured the head diameter and O ring diameter, when fitted the O ring is 26 mm and 3 mm in diameter so it's a good job i have a big red box of different size rubber O rings to hand. But this is where i shall leave this blog for now as it's gone on a fair bit, when i get all the photos in of fixing the problems there will be the next part.

TTFN

Wing Commander Sir Nigel Tetlington-Smythe

Tuesday, 18 February 2014

Field Cutlery Part 3, or May be Part 4


So far i had made three blades with full tangs and for a while they just sat in the shed getting grubby, until eventually i decided that the carbon steel blades needed a clean which luckily i could do any time i had a spare ten minutes. There were a lot of surface scratches that i polished out with very fine sand paper and a spot of oil, this was done along the length of the blade until i had a finish i was happy with. There were some marks which would not polish out but i thought it added character, besides this is my first attempt and i'll know how to do a much better and efficient job next time.

A hand sander has a hardish foam pad behind the sand paper,this makes it loads easier to sand out any small marks and polish it.


The scales or handle was to be two pieces of wood glued either side of the tang with 6 mm bar for pins which adds strength, i could then sand the wood till it conformed to the shape of the tang and was thin enough to hold comfortably. However finding the right piece of wood in my wood bits pile was not forth coming, that was until i found an old acoustic guitar neck and removed the hard wood finger board. 

Guitar fret board is Rose wood, i think

I then removed the frets and cleaned any crap off of it, i then cut down the middle of the neck partway and cut across giving me two pieces that fitted over the tang.

Two sides are big enough to cover all the tang

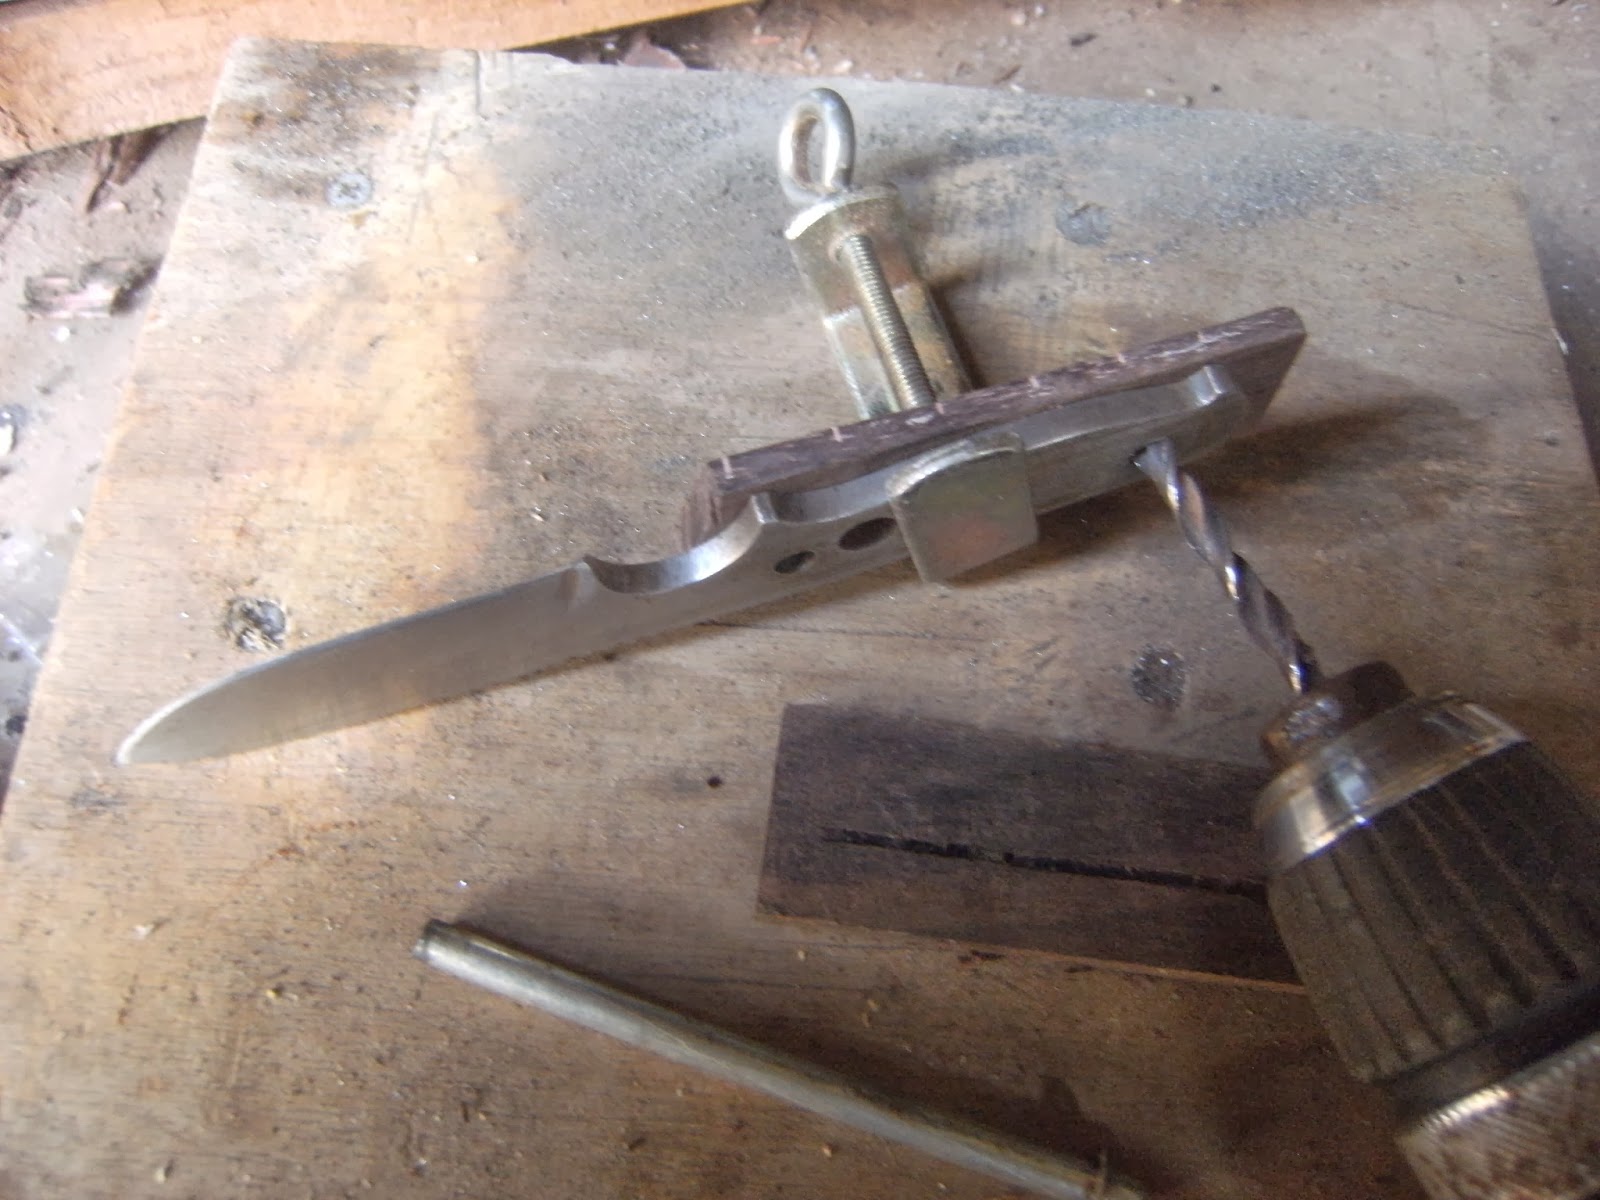
Out of the three 6 mm holes for the pins i decided to use the two at iether  end, and as i didn't use a pillar drill when making the holes on the tang i clamped the wood on and drilled its pin hole through the tang hole. 

Once i had a nice angle across the rear of the choil (fore finger grip), i clamped and drilled.

 Then i repeated the procedure with the other piece once i removed the drilled first side piece, one of the holes on the tang was drilled at a slight angle so this was the only way to line up the holes for the pins.

Drilling the other side through first side and tang gives a straight hole.

You can see it's not at 90 degrees to the blade, next time i'll use a pillar drill i suppose.

With all the surfaces polished and clean i put the pins in the tang,

Cut two pins from 6 mm ali bar.

 i applied a good measure of Loctite Super Glue to every part of the surfaces to be bonded. After leaving it 20 seconds i fitted the wood over the pins and to the tang, then clamped as much area as possible as the pins did stick out in places.

Glued, clamped, and put aside in the house, as the shed is pretty damp this time of year.

After leaving it for 24 hours to get the best bond possible i removed it from the clamp, 

All glued and set.

i then fitted a 60 grit sandpaper disk to the drill and removed any excess wood so it was the same shape as the tang. 

Sanded wood to the contour of the tang.

It was way too wide still and there were still cuts running down from where the frets were originally, so i ran both sides over the sander till it looked and felt right. 

Shaping the handle.

At first i went for a 60 degree angle around the edges, and though it did look good i eventually rounded the edges off and left some of the fret marks

Happy enough with this one, the remaining bit of fret cuts from the guitar neck match both sides of the handle.

Once i was happy with the shape i sanded down the wood with finer and finer sand paper, then finished it off with about four coats of Danish oil.

Mmmmm, Danish oil.

I have to admit i was very happy with the results, and i enjoyed the whole process of making it. This is the first one and there are imperfections here and there, but this one is for me and those imperfections are character in my opinion. I learned some good tricks and discovered things that just don't work well at all, so the next one should be pretty smart compared to this one.

Not too big and very comfortable to handle.
Building a sheath for this knife and others should be easy enough, there is a wealth of info on the internet about it. I'm thinking of getting some off cut leather off EBay, as i can't find a cheap enough bit of leather clothing from the local charity shops. I have a step by step guide on how to make a DIY gun holster in an old copy of Airgunner from last spring, Making a sheath from this method would be even easier

TTFN

Wing Commander Sir Nigel Tetlington-Smythe.


Thursday, 16 January 2014

Barnett Pro Diablo Slingshot


 My at times annoying git of a wife got me a slingshot for a Xmas prezzie and that was really nice of her because i actually realised it was a pretty cool thing to get and not making her such an annoying bugger after all, i  mean she can be a right royal pain in the arse on the odd occasion but as far as buying me a slingshot goes that was pretty cool.

feels nice to shoot.

 Nice one wifey, i know it's not an air rifle related prezzie but it still fires heavy projectiles at a fare rate.

Thank you for my Barnett Pro Diablo slingshot dear wife.


Any way it's a Barnett Pro Diablo, which means it's got a sighting devise and some counter balancing weights on top of your basic Barnett sling shot. I love the ram's horn design for the sling to fit on to, maybe it helps with the claim for it being the most powerful slingshot in the world.


They used to make quality  Black Widow's when i was young and they had leather wrist supports unlike the plastic ones you get today, and it's the same today as it's the world over.

I'm sure this was leather when i was a kid, but then Wagon Wheels were bigger back then as well.

For 30 quid with spare rubber and shot it's a pretty fair deal, and so thought my wifey and that's why she got it for me. However after testing it i thought it could have done with a higher quality stronger tubular band to make a clean killing shot when used,

Surgical tubular banb that is supplied with the Diablo's, classed as magnum.

thank fuck for Google and Ebay for punting out such over power goodies for slingshots. crossbows, and air rifles. What is really cool about this baby is the sight, it may be very simple but it does the job straight out the box

Simple but effective sight, very adaptable.

 However you might take a while sorting it out to your own personal preference, it will pretty much adapt to your own style like my style of holding the slingshot sideways.

Just as comfy to shoot held like this, photo was done by wifey using her new fish eye lens.

 The counter weights somehow seem to make the whole firing experience a lot more comfortable, but they don't screw in securely and you have to end up using Super Glue.

Counter balances help spread the load.

But side ways held or up right the counter weights do help a lot, and you don't really have to hold the ergonomic grip as it will just sit there supported on your wrist.

Wifey modeling the Pro Diablo, showing where not to place the wrist support.

Though it's best you do hold that grip when you take that shot as it will fall out your hand when you release the sling, but you can pull the pouch right back and balance the thing in the palm of you hand, cool stuff. I've seen film of people firing arrows with these things,

Place that is ideal for fitting a guide for arrows

but you would need to add some sort of guide i would imagine. With the sight eventually set up right i have been getting 6 mm steel shot to within a couple of inches of aim at 30 yards, so it's head straight and always release the pouch from exactly the same place from the side of my jaw every time.

I can't use the thing in the back garden in case the bloke a couple of doors up thinks i'm firing air rifles again and complains to the coppers or housing group, and when one of those 6 mm steel balls hits the back fence it is pretty loud but has no where near enough energy to hole it by then.

Any way back to the counter balances which do help in quite a few ways, that is if they would screw in properly and stay there as that is what your supposed to do. You fit the weights and counter balances one time and don't remove them, or you will strip the thread by taking them off and on again repeatedly. The main heavy one screws into the base of the grip and helps stop the slingshot tipping back when pulling back the sling, or would if there was a hole to screw it into.

This is one heavy chunk of stainless and really helps hold the slingshot steady, i mean it REALLY  does.

It screws into the outer rubber grip but it looks like i'm going to have to drill a hole into the base material, it holds for now but does move about a bit. The two longer and lighter counter balances that fork out from the front help steady you hold and aim, they both screwed in but one on the right is a little loose and wobbles slightly.

Front counter weights are stableisers.

These balances turn it from the Diablo to the Pro Diablo along with the addition of the sight, it has some real heft and is pretty accurate but it's not something you can hide on your person very easily.

Not so easy to conceal.

This thing is excellent fun but it's a shame about the counter weights being loose, this came from Ronnie Sunshine's and they would replace it no hassle if you got one with any problems as they are a very reliable company. But for me it's not a problem as i have the tools and knowledge to fix any niggles, that is when i can be arsed to get around to it as it's still working fine at the moment. I know there is some old wise proverb about fixing things before they get any worse, but i'm buggered if i can remember what it is. The only proverb that readily springs to mind for me most of the time is "A bird in your hand craps all over your wrist"

TTFN

Wing Commander Sir Nigel Tetlington-Smythe


Ooh, ooh, oh yeah, i just remembered i got given one of those self cocking crossbow pistols years back and they are great fun, if not a little bit leathal. Then i broke the open rear sights buy storing it underneath about two hundred weight of baby clothes, but i should get that up and running again as it would now be easy to knock up some replacement sights with the knowledge i've picked up in the last year.

Mmmmmmmm yeah.